快速开始
给机器人通电
要给机器人供电,请将其放在充电底座上。Create®3光环将打开,树莓派也将通电。要关闭机器人的电源,请将其从坞中取出,并按住Create®3上的电源按钮。光环将闪烁3次,Create®3将在关闭前播放声音。
User PC
这些说明将设置用户PC和机器人进行基本通信。进一步的设置将取决于所选择的网络配置。
Installing ROS 2
要与机器人对接,建议使用运行适当版本的Ubuntu Desktop的远程PC,并安装ROS 2。
在ros galactic版本下如此安装:
Required OS: Ubuntu 20.04
Follow these instructions to install ROS 2 Galactic on your PC.
Once ROS 2 is installed, install
turtlebot4_desktop:sudo apt update && sudo apt install ros-galactic-turtlebot4-desktop
在你的PC上安装ROS2 Galactic
按照以下说明在您的电脑上安装ROS2 Galaxy Desktop。
此外,使用以下命令安装有用的工具:
sudo apt update && sudo apt install -y \
  build-essential \
  cmake \
  git \
  python3-colcon-common-extensions \
  python3-flake8 \
  python3-pip \
  python3-pytest-cov \
  python3-rosdep \
  python3-setuptools \
  python3-vcstool \
  wget
Robot
Robot机器人
设置TurtleBot 4的第一步是打开电源并将其连接到您的Wi-Fi网络。
接通机器人电源
将TurtleBot 4放置在其底座上。底座上的绿色LED将亮几秒钟,TurtleBot 4应该会通电。给机器人一些时间启动。
有关机器人按钮和指示灯的更多详细信息,请访问 Create®3 Documentation
连接到接入点
在第一次启动时,Raspberry Pi将进入接入点(AP)模式,这将允许您通过Wi-Fi连接到它。在您的电脑上,连接到 Turtlebot4Wi-Fi网络。密码也是 Turtlebot4。
TurtleBot 4 AP网络是一个5GHz网络。您的计算机需要支持5GHz Wi-Fi才能连接到网络。
SSH进入树莓派
连接后,您可以通过SSH连接到Raspberry Pi以配置其Wi-Fi。在电脑上打开一个终端,然后输入:
ssh ubuntu@10.42.0.1
使用密码 turtlebot4登录。
将树莓派连接到您的网络
登录后,将Raspberry Pi配置为连接到您的Wi-Fi网络。
将Raspberry Pi连接到5GHz Wi-Fi网络以获得最佳性能。
In your SSH session, call:
sudo wifi.sh -s '<WIFI_SSID>' -p '<WIFI_PASSWORD>' -r <REGULATORY_DOMAIN> && sudo reboot
- Note
监管域基于您居住的国家。美国:
US,加拿大:CA,英国:GB,德国:DE,日本:JP3,西班牙:ES。有关完整列表,请单击here。
查找新的Raspberry Pi IP
一旦应用了Wi-Fi设置,Raspberry Pi将重新启动并连接到您的网络。DHCP将为其分配一个新的IP地址。在TurtleBot 4上,此IP地址将显示在显示屏顶部。
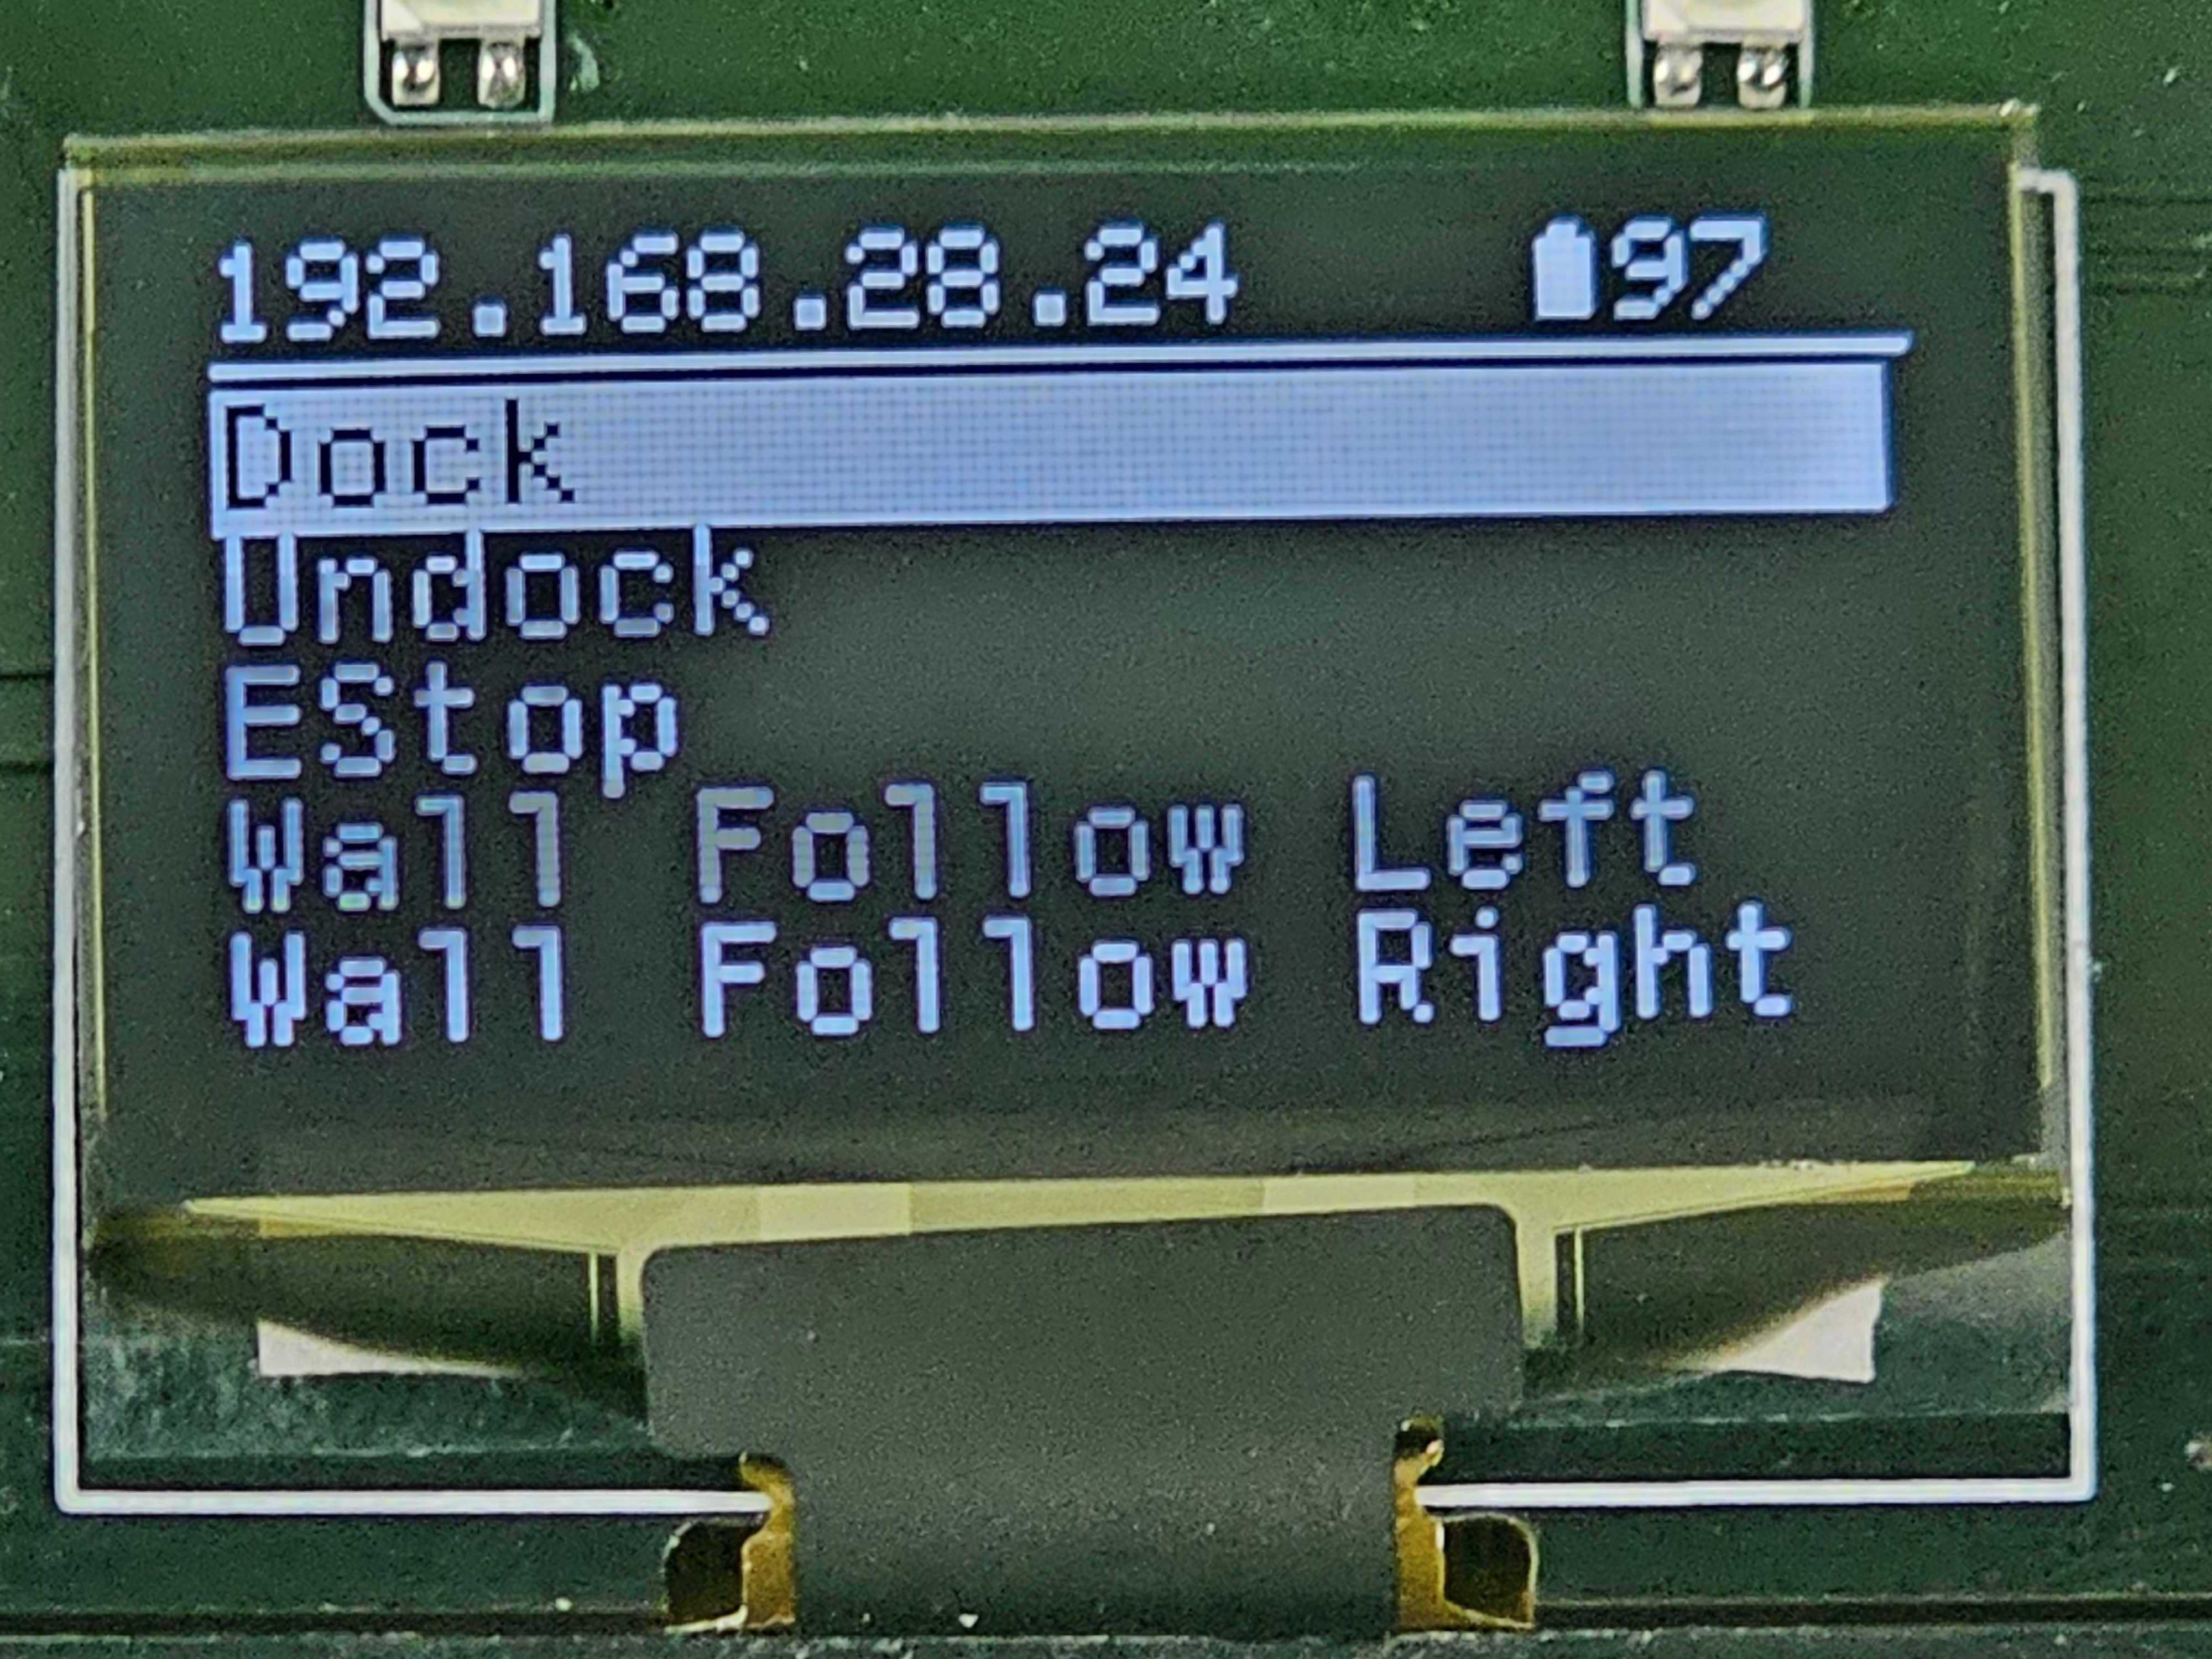
对于TurtleBot 4 Lite,您需要检查新地址的 /ip topic。
在电脑上运行以下命令:
source /opt/ros/galactic/setup.bash export RMW_IMPLEMENTATION=rmw_cyclonedds_cpp export ROS_DOMAIN_ID=0 ros2 topic echo /ip
您应该定期在终端中看到打印出来的IP地址。
$ ros2 topic echo /ip data: 192.168.28.24 --- data: 192.168.28.24 ---
如果您无法使用以前的方法找到IP地址,请尝试登录网关并查找主机名为“ubuntu”的设备。
一旦您找到了IP地址,您现在就可以用它SSH回到机器人中。
ssh ubuntu@192.168.28.24
访问Create®3 Web服务器
一旦您获得了Raspberry Pi的IP地址,您就可以访问Create® 3 webserver。
打开网络浏览器,使用8080端口导航到您的Raspberry Pi IP。

您将看到Create®3 Web服务器主页。

更新TurtleBot 4
建议您在首次使用Create®3和Raspberry Pi时同时更新它,以获得最新的错误修复和改进。
Create® 3
检查 Create® 3 software releases,查看是否有更新的固件版本。您可以通过访问Web服务器来检查Create®3的固件版本。
如果有新的固件可用,请下载它,然后访问 webserver。转到“ Update”选项卡,上传固件,然后更新您的机器人。
Raspberry Pi packages
SSH进入Raspberry Pi,然后通过调用更新所有软件包:
sudo apt update && sudo apt upgrade
网络配置
ROS2 Galactic supports two middlewares: CycloneDDS and FastRTPS. The default is CycloneDDS.
The Create® 3 and Raspberry Pi both use the usb0 and wlan0 network interfaces to communicate. As a result, CycloneDDS needs to be configured on the user PC in order to see the robot topics properly. CycloneDDS is configured in an XML file, and that configuration should be applied to the CYCLONEDDS_URI environment variable.
An example XML file is available here. Download this file to your PC by calling:
wget https://raw.githubusercontent.com/turtlebot/turtlebot4_setup/galactic/conf/cyclonedds_pc.xml
Note
The <DontRoute>true</DontRoute> setting is required to see the Create 3 topics.
网络接口
By default, CycloneDDS will automatically choose the best network interface for ROS2 communications. On some occasions it might choose the wrong interface. To mitigate this, you can specify which network interface CycloneDDS should use for ROS2 communication. Open your terminal and use the command ip link to view all available network interfaces. Your WiFi interface will look something like this:
3: wlp0s20f3: <BROADCAST,MULTICAST,UP,LOWER_UP> mtu 1500 qdisc noqueue state UP mode DORMANT group default qlen 1000 link/ether dc:41:a9:9f:5f:ec brd ff:ff:ff:ff:ff:ff
Open the cyclonedds_pc.xml file with a text editor and add the following line below <DontRoute>true</DontRoute>
<NetworkInterfaceAddress>wlp0s20f3</NetworkInterfaceAddress>
replacing wlp0s20f3 with your WiFi interface name. Your cyclonedds_pc.xml file should now look like this:
<CycloneDDS> <Domain> <General> <DontRoute>true</DontRoute> <NetworkInterfaceAddress>wlp0s20f3</NetworkInterfaceAddress> </General> </Domain> </CycloneDDS>
Note
You can use multiple network interfaces by adding each interface name within the NetworkInterfaceAddress tag and separating each name with a comma.
应用 CycloneDDS 配置
Move the xml file to a convenient location:
sudo mv cyclonedds_pc.xml /etc/
Add this line to your ~/.bashrc file to automatically configure CycloneDDS each time you open a new terminal:
export CYCLONEDDS_URI=/etc/cyclonedds_pc.xml
Source ~/.bashrc to apply the configurations to your current terminal.
source ~/.bashrc
For more CycloneDDS configuration options, visit the CycloneDDS documentation.
If you wish to switch middlewares or want more information on configuring the Create® 3, check out the Create® 3 Docs.
网络配置方式一:简单发现

TurtleBot 4 操控手柄设置
TurtleBot 4附带一个TurtleBot4遥控手柄。它提前与树莓派搭配。
如果您希望手动配对控制器,请按照以下说明进行操作:
SSH into the TurtleBot 4
sudo bluetoothctl
bluetoothdCLI界面将启动。键入
scan on,然后按回车键。按住TurtleBot 4控制器上的主页和共享按钮,直到指示灯开始闪烁。

在CLI中查找要找到的无线控制器设备。它的MAC地址类似于
A0:5A:5C:DF:4D:7F。复制MAC地址。
在CLI中,输入
trust MAC_ADDRESS,将MAC_ADDRESS替换为控制器地址。然后,输入
pair MAC_ADDRESS。最后,输入
connect MAC_ADDRESS.CLI应报告控制器已连接,并且控制器上的指示灯将变为蓝色。
输入
exit退出CLI。
WiFi 设置
On the first boot, the Raspberry Pi will enter AP mode which will allow you to connect to it over WiFi.
On a PC, connect to the
Turtlebot4WiFi network. The password is alsoTurtlebot4.
Note
The TurtleBot 4 AP network is a 5GHz network. Your computer will need to support 5GHz WiFi to connect to the network.
Once connected, you can SSH into the Raspberry Pi to configure its WiFi.
ssh ubuntu@10.42.0.1
The default password is
turtlebot4In
/usr/local/binthere will be a script calledwifi.shwhich can be used to configure the Raspberry Pi's WiFi:
sudo wifi.sh -s '<WIFI_SSID>' -p '<WIFI_PASSWORD>' -r <REGULATORY_DOMAIN> && sudo reboot
Note
The Regulatory Domain is based on the country you live in. USA: US, Canada: CA, UK: GB, Germany: DE, Japan: JP3, Spain: ES. For a full list, click here.
Your Raspberry Pi will reboot and connect to your WiFi network.
Tip
Connect the Raspberry Pi to a 5GHz WiFi network for optimal performance.
Find the Raspberry Pi IP on your network
The TurtleBot 4 will display its WiFi IP address on the display.
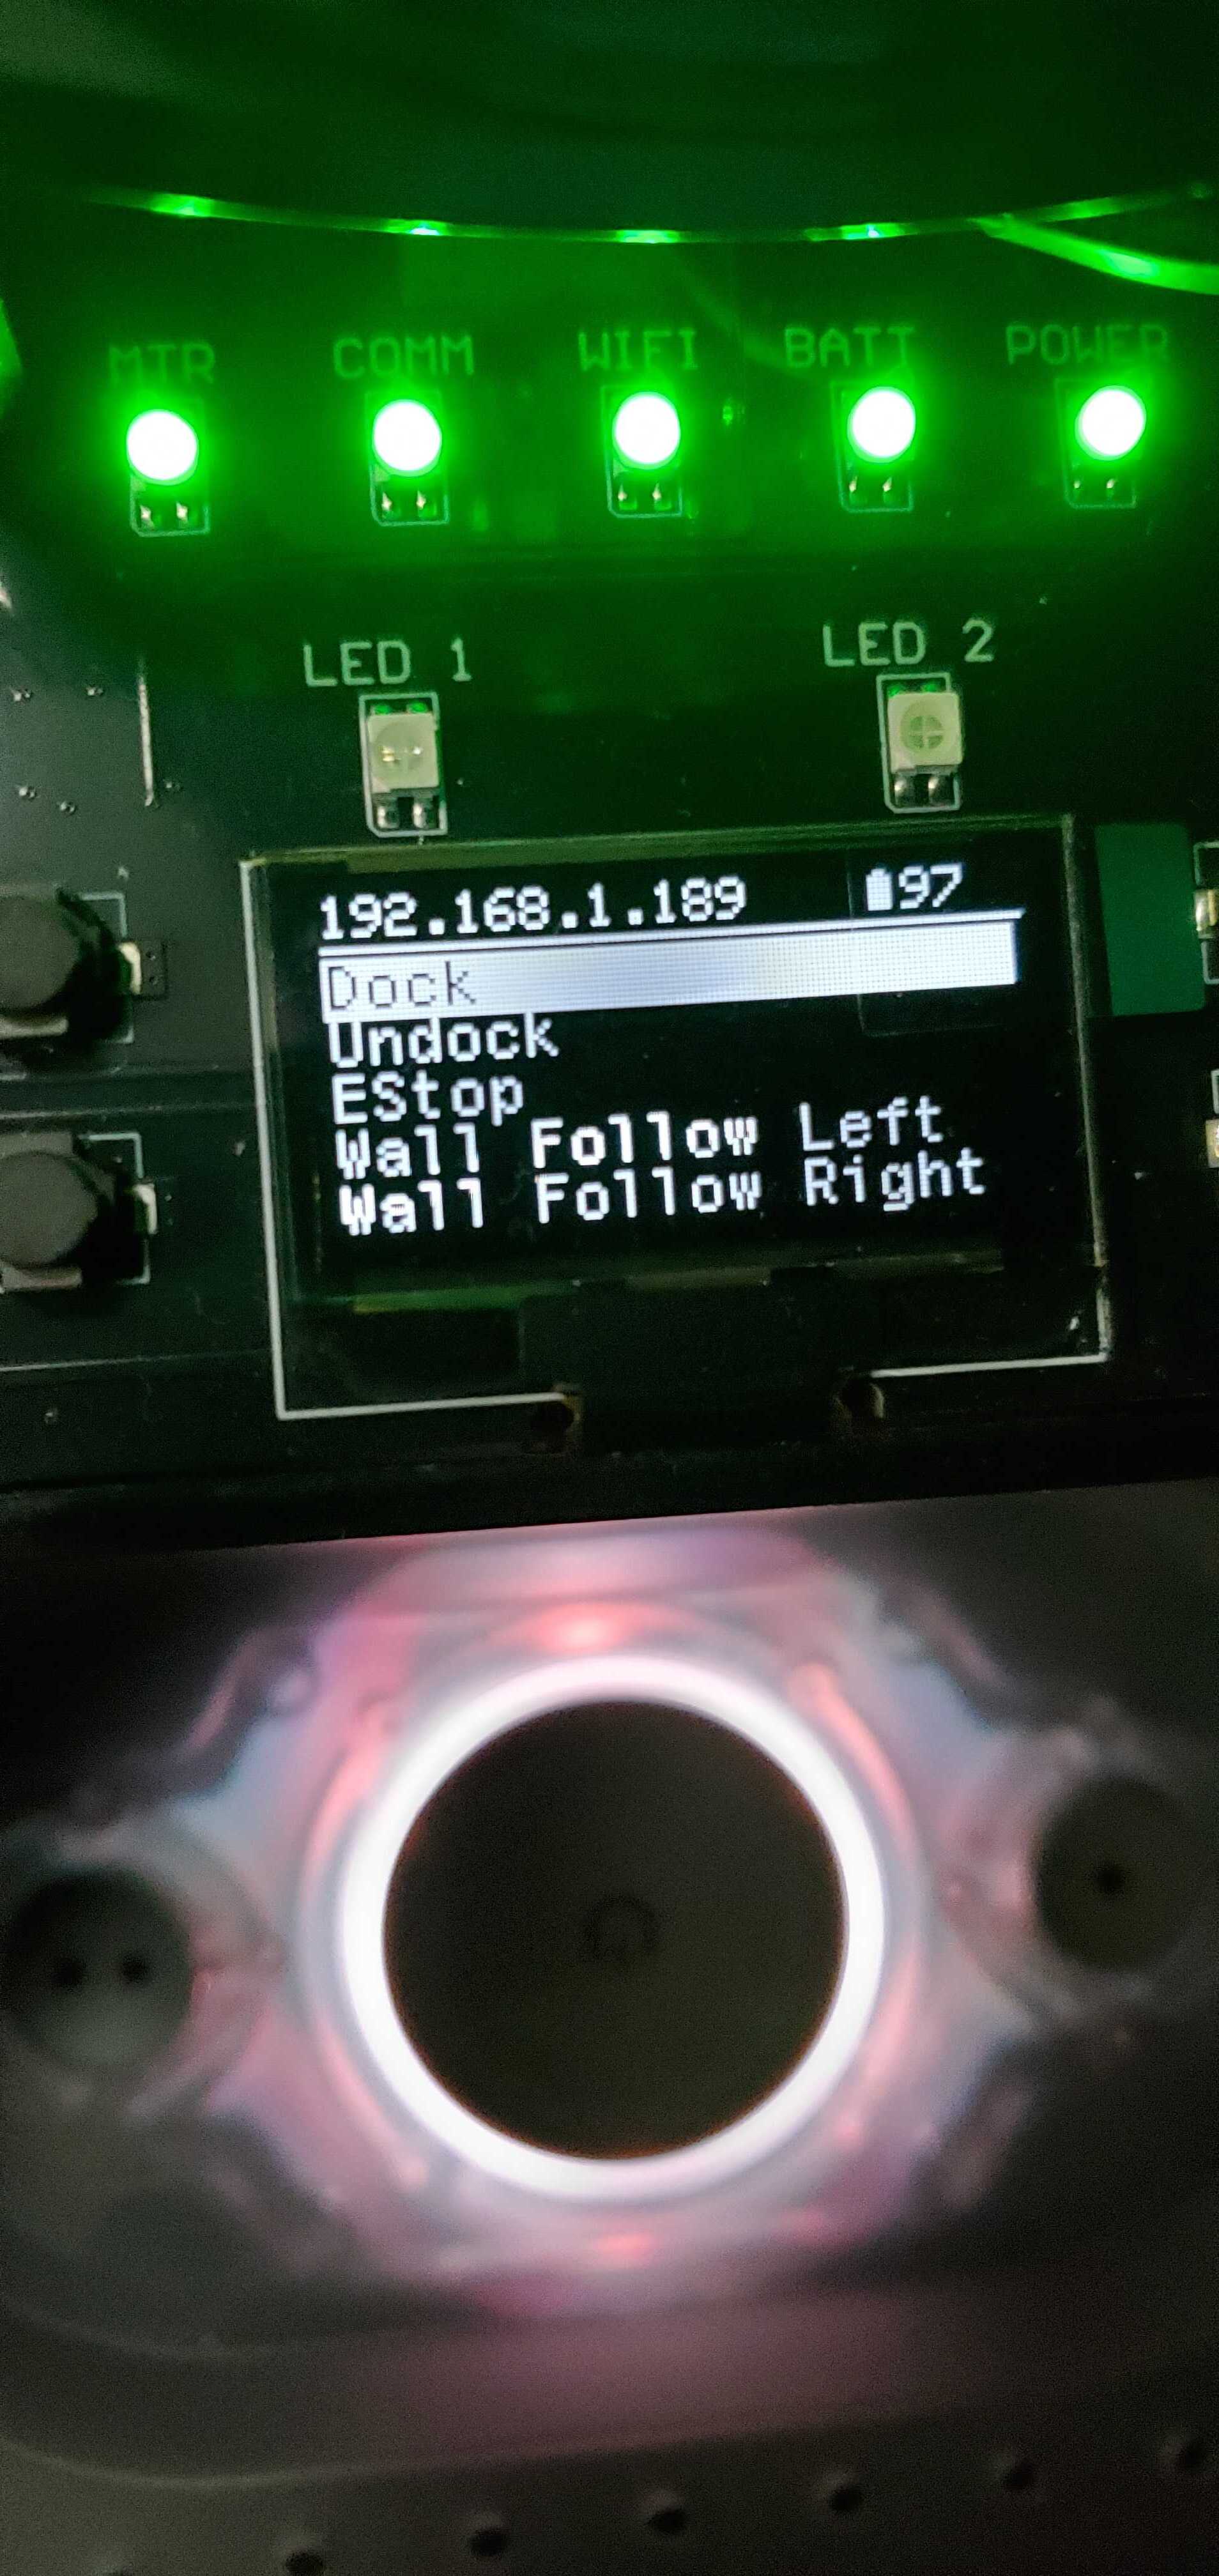
TurtleBot 4上的WiFi IP地址
For the TurtleBot 4 Lite, you will need to check the /ip topic for the new address.
On your PC, run the following commands:
source /opt/ros/galactic/setup.bash ros2 topic echo /ip
You should see the IP address printed out in your terminal periodically.

响应TurtleBot 4的IP地址
If you are unable to find the IP address with the previous methods, you can try to use:
nmap -sP 192.168.1.0/24
Make sure to replace 192.168.1 with your subnet.
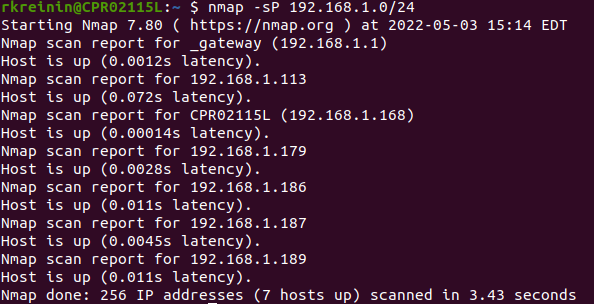
使用nmap扫描IP地址
Once you have found the IP address, you can now ssh back into the robot with it.
ssh ubuntu@xxx.xxx.xxx.xxx
If you wish to put the Raspberry Pi back into AP mode, you can call
sudo wifi.sh -a
Tip
If you are moving your TurtleBot 4 to a new location with a different WiFi network, reconfigure the Raspberry Pi to connect to that network beforehand or place it into AP mode. Otherwise it will continue trying to connect to your current network.
网络配置方式二:发现服务器

Create® 3
要将TurtleBot 4与Simple Discovery一起使用,Create®3应连接到Wi-Fi。
Wi-Fi Setup
访问 Create® 3 webserver,然后导航到“连接”选项卡。输入您的Wi-Fi SSID和密码,然后单击“连接”。

等待它连接到Wi-Fi并播放一声蜂鸣声。“连接”选项卡现在应该显示一个IP地址。

Application Configuration应用程序配置
访问 Create® 3 webserver,然后导航到“Application Configuration”选项卡。将ROS 2域ID设置为0,将ROS 2-命名空间设置为空字符串,并将RMW_IMPLEMENTATION设置为ROS 2版本的 default。此外,请确保已禁用快速DDS发现服务器。
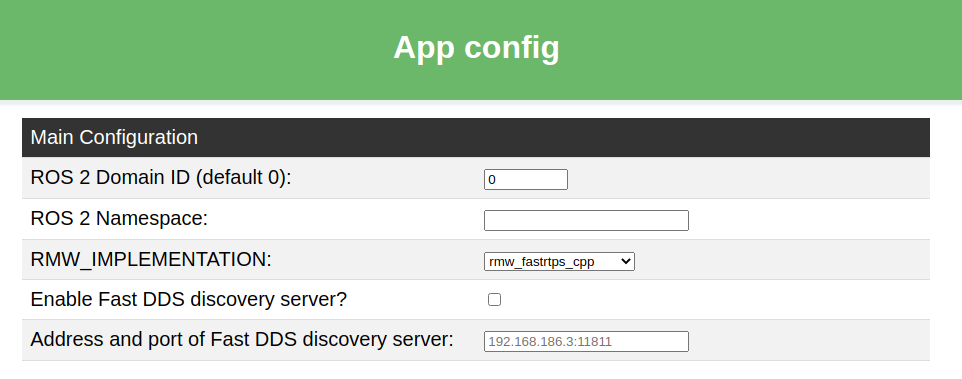
为Humble配置Create®3应用程序
TB4网络配置
TurtleBot 4由两个计算单元组成:Create®3和Raspberry Pi。它们通过USB-C电缆相互连接,该电缆用于为Raspberry Pi供电,并在单元之间建立以太网连接。两个单元都有无线网卡。Create®3只能连接到2.4 GHz网络,而树莓派可以连接到2.4和5 GHz网络。用户还可以使用他们的电脑通过Wi-Fi与机器人进行通信。
接入点模式
当在没有Wi-Fi连接的区域使用机器人时,将Raspberry Pi置于接入点模式可能很有用。
SSH into the Raspberry Pi and call:
sudo wifi.sh -a && sudo reboot
The Raspberry Pi will revert back to the original AP mode.
Optionally you can set your own SSID and password with:
sudo wifi.sh -s '<SSID>' -p '<PASSWORD>' -a && sudo reboot

底座Create® 3的WiFi 设置
Access the webserver (v0.1.3 or higher)
In a browser, enter the IP address of your TurtleBot 4 Raspberry Pi with the port
8080. e.g.192.168.1.189:8080.
Access the webserver (v0.1.2 or higher)
Press both Create® 3 button 1 and 2 simultaneously until light ring turns blue
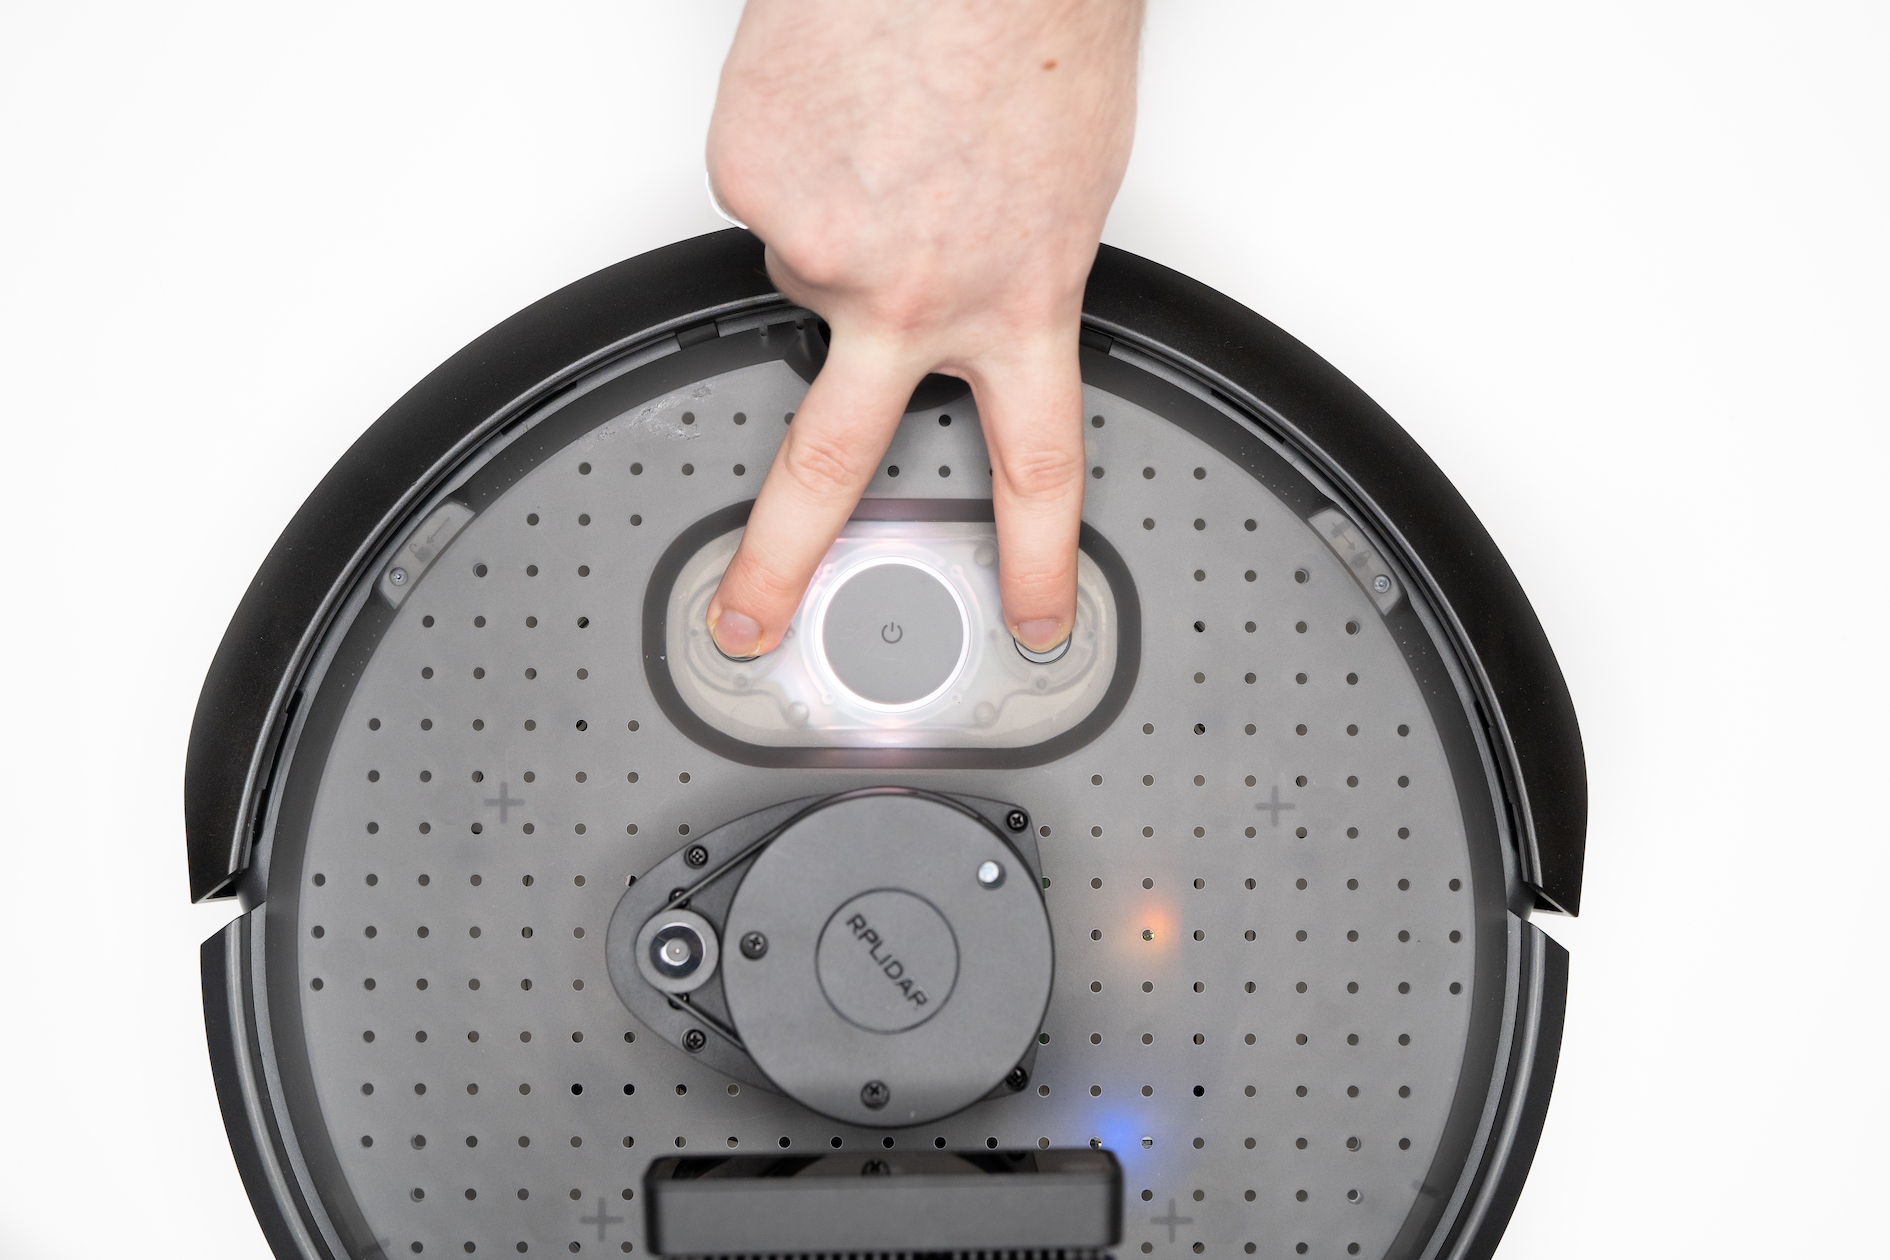
将Create®3置于AP模式
The Create® 3 is now in AP mode. Connect to its WiFi network called ‘Create-XXXX'
In a browser go to
192.168.10.1
Connect to WiFi
Go to the Connect tab, enter your WiFi ssid and password, and then click ‘Connect'
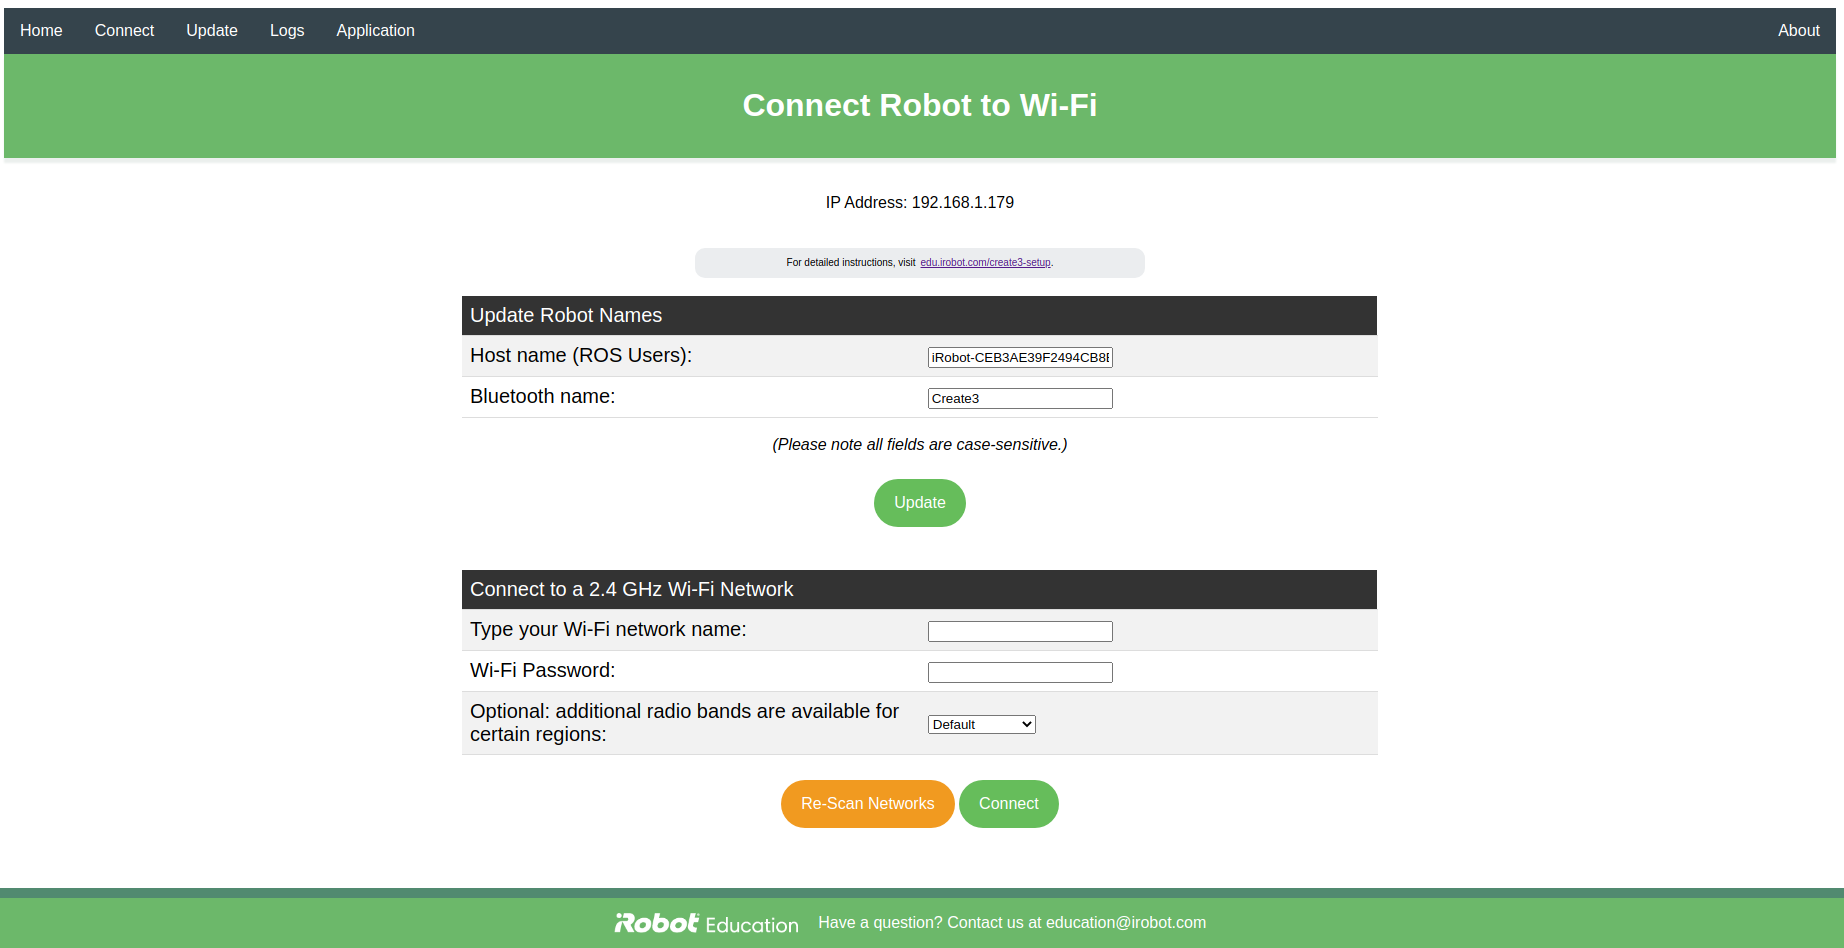
将Create®3连接到WiFi
Wait for it to connect to WiFi and play a chime
On your PC, run
ros2 topic listto ensure that the Create® 3 is publishing its topics
Note
The Create® 3 can only be connected to 2.4 GHz WiFi networks.
机器人网络配置
Create® 3
Create®3需要更新到最新固件,并禁用其Wi-Fi。
设置说明:
使用Web服务器更新到 latest firmware。
更新后,执行 factory reset以断开Create®3与任何Wi-Fi网络的连接。
Raspberry Pi树莓派
树莓派需要将自己配置为发现服务器,并使用新配置重新安装TurtleBot 4 upstart job。
设置说明:
SSH 进入 Raspberry Pi树莓派
turtlebot4-setup
通过 ROS Setup设置进入Discovery Server菜单。
启用发现服务器。
保留IP地址为
127.0.0.1,端口为11811。保存设置,导航到主菜单,然后应用设置。
退出设置工具
在您的终端中,输入
turtlebot4-source以应用新设置。用
turtlebot4-daemon-restartorros2 daemon stop; ros2 daemon start以重新启动 ROS 2 daemon。当Create®3铃声响起时,调用
ros2 topic list查看主题

用户电脑配置(简单发现方式)
用户PC应配置为使用与机器人相同的DDS vendor和ROS_DOMAIN_ID。建议使用ROS 2版本的默认DDS。
Create a file called
setup.bashin a convenient location:sudo mkdir /etc/turtlebot4/ sudo touch /etc/turtlebot4/setup.bash
Add the following lines to
setup.bashwith your favourite text editor:source /opt/ros/humble/setup.bash export ROS_DOMAIN_ID=0 export RMW_IMPLEMENTATION=rmw_fastrtps_cpp
Tip
Source your workspaces and export any other environment variables in this file.
Finally, add the following line in
~/.bashrcto apply the settings to every new terminal:source /etc/turtlebot4/setup.bash

附加CycloneDDS配置
如果使用CycloneDDS,用户PC需要进一步配置才能正确查看机器人主题。CycloneDDS是在XML文件中配置的,该配置应应用于CYCLONEDDS_URI环境变量。这里 here提供了一个示例XML文件。通过以下方式将此文件下载到您的电脑:
wget https://raw.githubusercontent.com/turtlebot/turtlebot4_setup/galactic/conf/cyclonedds_pc.xml

将xml文件移动到方便的位置:
sudo mv cyclonedds_pc.xml /etc/turtlebot4/
将此行添加到 /etc/turtlebot4/setup.bash文件中,以在每次打开新终端时自动配置CycloneDDS:
export CYCLONEDDS_URI=/etc/turtlebot4/cyclonedds_pc.xml

有关更多CycloneDDS配置选项,请访问 CycloneDDS documentation.
DDS
ROS 2有多个 DDS供应商,但TurtleBot 4仅支持CycloneDDS和FastDDS。在Galactic中,CycloneDDS是默认设置,而在Humble中,FastDDS是默认值。TurtleBot 4可以在两个版本的ROS 2上的两种DDS实现之间切换。
恢复树莓派
如果您输入了不正确的Wi-Fi凭据或Wi-Fi网络关闭,您将无法通过Wi-Fi访问Raspberry Pi。要从中恢复,您可以使用以太网电缆直接连接到Raspberry Pi。您的电脑可能需要一个USB到以太网适配器。

Raspberry Pi使用静态IP地址作为以太网接口, 192.168.185.3。您需要将有线连接配置为使用相同的子网:
转到有线连接设置。
将IPv4方法设置为
Manual,并设置静态IP。IP地址不能与Raspberry Pi相同。
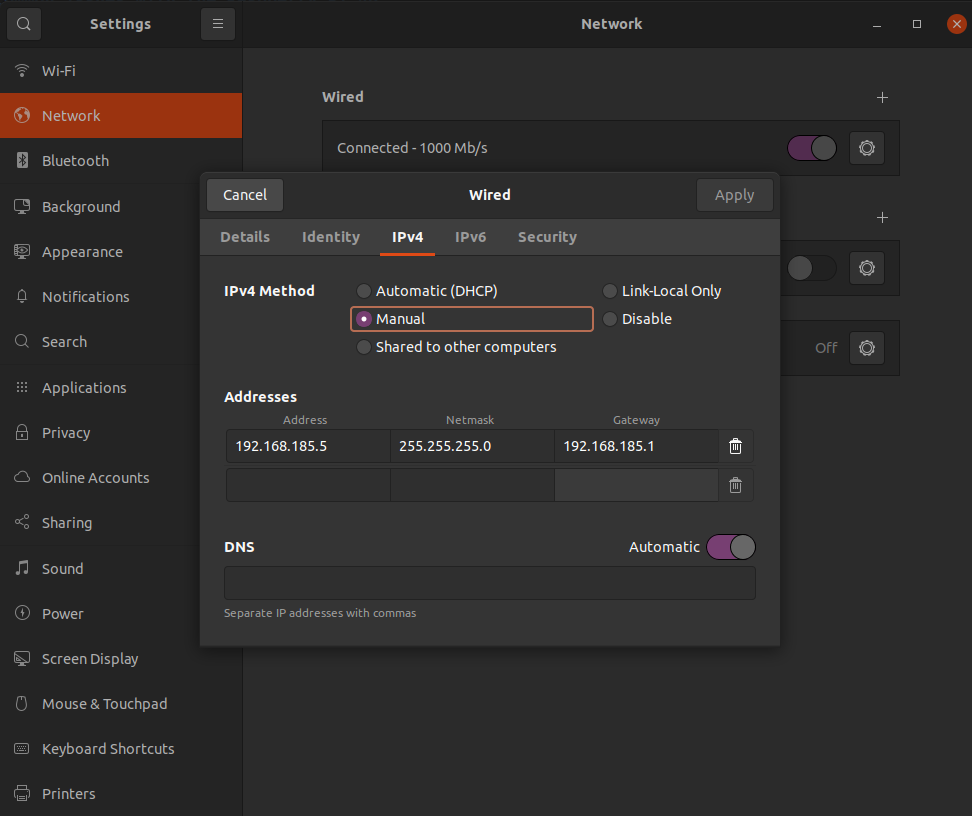
单击“应用”
现在,您可以进入您的终端,并通过键入SSH进入机器人:
ssh ubuntu@192.168.185.3
TurtleBot 4 控制器设置
The TurtleBot 4 comes with an included TurtleBot 4 Controller. It is paired in advance with the Raspberry Pi.
If you wish to manually pair a controller, follow these instructions:
SSH into the TurtleBot 4
sudo bluetoothctl --agent=NoInputNoOutput
The
bluetoothdCLI interface will start.Type
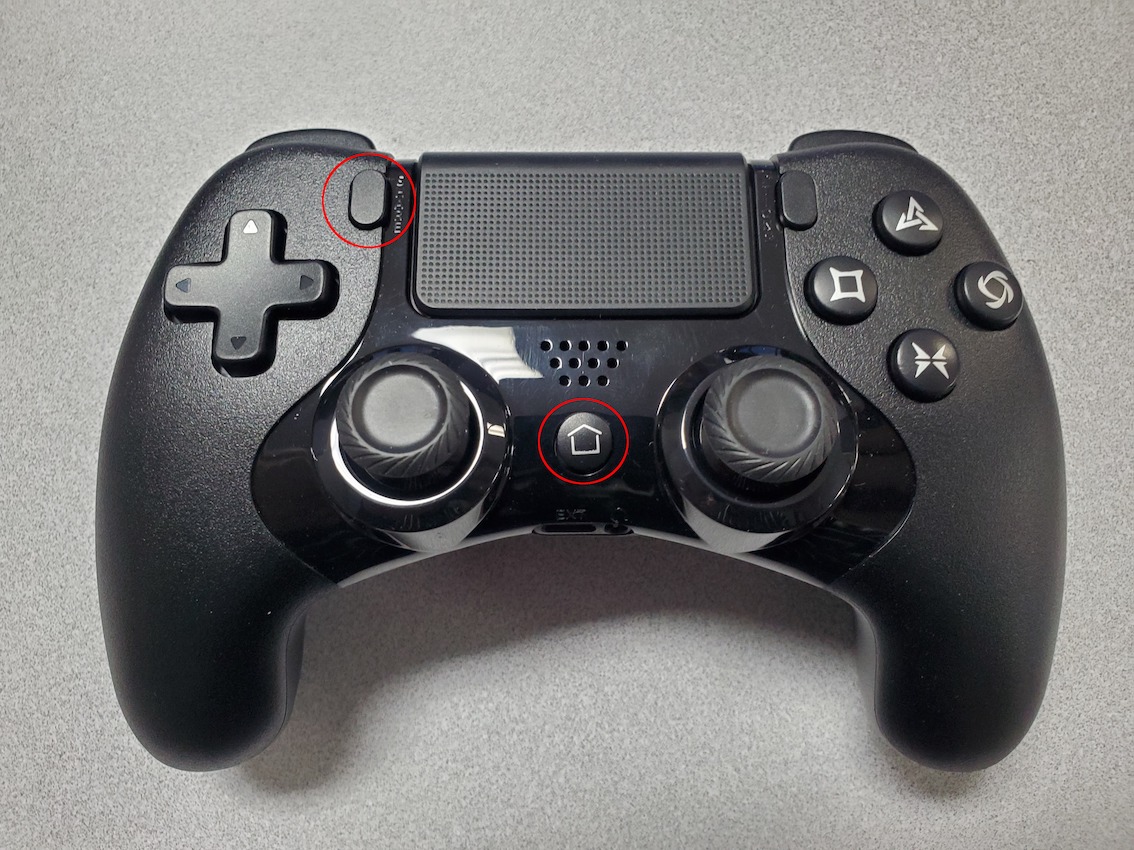
scan onand press enter.Press and hold both the home and share buttons on the TurtleBot 4 controller until the light starts blinking.
![]()
将TurtleBot 4置于配对模式
In the CLI look for a Wireless Controller device to be found. It will have a MAC address similar to
A0:5A:5C:DF:4D:7F.Copy the MAC address.
In the CLI enter
trust MAC_ADDRESS, replacingMAC_ADDRESSwith the controllers address.Then, enter
pair MAC_ADDRESS.Finally, enter
connect MAC_ADDRESS.The CLI should report that the controller has been connected and the light on the controller will turn blue.
Enter
exitto exit the CLI.
Visit the Driving Tutorial to begin driving your TurtleBot 4.
用户电脑配置(发现服务器)
由于Create®3与用户PC不在同一网络上,因此必须通过Raspberry Pi向Create®3添加IP路由。该路由必须始终处于上行状态,以保持PC和Create®3之间的连接。此外,系统中的每个设备都必须使用 rmw_fastrtps_cpp作为它们的DDS,并且必须定义 ROS_DISCOVERY_SERVER环境变量来通知FastDDS服务器的IP和端口。
turtlebot4_setup repo中存在一个用于配置用户PC的方便脚本。
要下载并运行脚本,请调用::
wget -qO - https://raw.githubusercontent.com/turtlebot/turtlebot4_setup/humble/turtlebot4_discovery/configure_discovery.sh | bash <(cat) </dev/tty
系统将提示您进行一些设置:
输入这些值后,脚本将执行以下操作:
脚本运行后,调用:
source ~/.bashrc
以应用新设置.
检查IP路由是否已通过调用应用:
ip route
你应该看到这样的条目:
192.168.186.0/24 via 10.0.0.121 dev wlp0s20f3
其中
10.0.0.121是您的Raspberry Pi IP,wlp0s20f3是您的Wi-Fi接口。检查脚本上一次调用的IP路由是否已存在。如果是,请删除路线。
创建一个名为
/etc/turtlebot4_discovery/的目录为给定的Raspberry Pi IP地址安装IP路由服务。
将FastDDS超级客户端配置 profile安装到
/etc/turtlebot4_discovery/。使用所需的配置将setup.bash文件安装到
/etc/turtlebot4_discovery/。将行源
source /etc/turtlebot4_discovery/setup.bash添加到~/.bashrc文件中。启用并启动IP路由服务。
树莓派Wi-Fi IP地址
Discovery Server IP地址(默认为Raspberry Pi IP)
Discovery Server端口(默认为11811)
机器人的
ROS_DOMAIN_ID(默认为0)然后,运行:
ros2 daemon stop; ros2 daemon start
以重新启动 ROS 2 daemon.
您现在应该可以看到Raspberry Pi和Create®3主题:
ros2 topic list


验证
验证您的电脑和机器人是否能够使用ROS主题进行通信。在机器人和您的电脑上运行以下命令,以显示Raspberry Pi和Create®3 ROS主题,并确保两个输出匹配:
ros2 topic list
Network Configurations
对于ROS 2网络,TurtleBot 4可以使用两种不同的配置:简单发现和发现服务器。
简单发现
简单发现是ROS 2使用的默认协议。简单发现使用多播允许主机同时向网络上的多个收件人发送数据包。在ROS 2中,这允许网络上的所有设备自动发现彼此的ROS 2节点。
要在多播配置中使用TurtleBot 4,RPi4和Create®3都应连接到同一个Wi-Fi网络。建议RPi4连接到5GHz网络以提高性能,因此网络必须桥接2.4和5 GHz频带
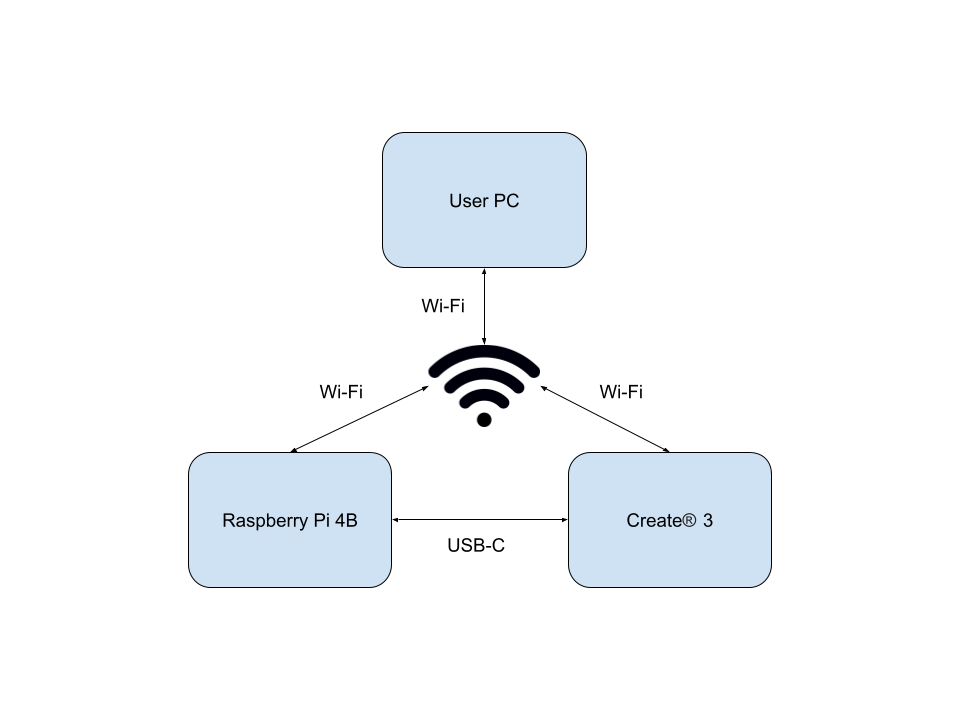
发现服务器
FastDDS发现服务器允许网络上的一个设备充当发现服务器,而其余设备则成为发现客户端。这类似于ROS 1中的ROS Master。有关更多详细信息,请查看Discovery Server documentation。
使用此配置,TurtleBot 4能够在Create®3未连接到Wi-Fi的情况下完全运行。

选择网络配置
每种配置都有其自身的优点和缺点。简单发现使您可以轻松地从网络上的任何设备与机器人进行交互。它是ROS 2中的默认发现协议,因此不需要额外的设置。此外,它同时支持CycloneDDS和FastDDS。主要缺点是该协议使用多播,这对于一些Wi-Fi网络(如大学和公司)来说可能是有问题的。此外,Create®3还必须连接到Wi-Fi,远程电脑才能与TurtleBot 4交互,因此网络必须桥接2.4和5 GHz频段。
使用发现服务器可以绕过多播问题,并允许TurtleBot 4仅在Raspberry Pi Wi-Fi的情况下运行。此配置的缺点是,Create®3、Raspberry Pi和用户PC需要额外设置。此外,Raspberrry Pi必须将流量从用户PC路由到Create®3,反之亦然。Discovery Server还需要FastDDS作为中间件。

更新TurtleBot 4
It is recommended to update both the Create® 3 and the Raspberry Pi when you first use it to receive the latest bug fixes and improvements.
Create® 3
Check the Create® 3 software releases to see if a newer firmware version is available. You can check the firmware version of your Create® 3 by visiting the webserver.
Update via webserver
The Create® 3 can be updated through its webserver:
Go to the Update tab and click the ‘Update' button.
The robot will automatically download and install the latest firmware.
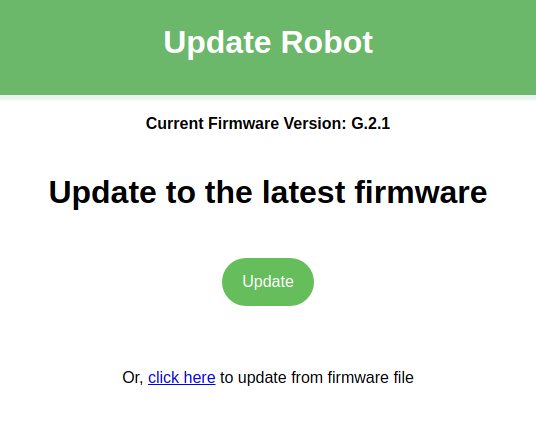
使用其Web服务器更新Create®3
Update over USB-C
The Create® 3 can also be updated over the USB-C interface:
Download the latest firmware from http://edu.irobot.com/create3-latest-fw.
Copy the firmware to the Raspberry Pi:
scp ~/Downloads/Create3-G.X.Y.swu ubuntu@xxx.xxx.xxx.xxx:/home/ubuntu/
SSH into the Raspberry Pi and update the Create® 3 firmware over USB-C:
sudo create_update.sh Create3-G.X.Y.swu
or
curl -X POST --data-binary @Create3-G.X.Y.swu http://192.168.186.2/api/firmware-update
This may take a few minutes.
Debian packages
Debian packages can be updated by calling:
sudo apt update sudo apt install <PACKAGE>
For example, updating the turtlebot4_desktop package can be done like this:
sudo apt update sudo apt install ros-galactic-turtlebot4-desktop
To update all robot packages, run:
sudo apt update sudo apt install ros-galactic-turtlebot4-base \ ros-galactic-turtlebot4-bringup \ ros-galactic-turtlebot4-description \ ros-galactic-turtlebot4-diagnostics \ ros-galactic-turtlebot4-msgs \ ros-galactic-turtlebot4-navigation \ ros-galactic-turtlebot4-node \ ros-galactic-turtlebot4-tests \
Source packages
To update a source package you will need to use a terminal to manually pull changes.
For example, updating the turtlebot4_robot repo on the galactic branch:
cd ~/turtlebot4_ws/src/turtlebot4_robot git checkout galactic git pull origin galactic
You will then need to rebuild the packages:
cd ~/turtlebot4_ws source /opt/ros/galactic/setup.bash colcon build --symlink-install source install/setup.bash
Install latest Raspberry Pi image
Warning
Installing a new image on the Raspberry Pi will delete any changes you may have made. Save your changes externally before proceeding.
Check your current image version by calling cat /etc/turtlebot4 on the Raspberry Pi. Find the latest TurtleBot 4 Raspberry Pi images at http://download.ros.org/downloads/turtlebot4/. If a newer version is available, follow these steps:
Download the latest image for your robot model and extract it.
Power off your robot and then remove the microSD card from the Raspberry Pi.
Insert the microSD card into your PC. You may need an adapter.
Install the imaging tool
dcfldd
sudo apt install dcfldd
Identify your SD card
sudo fdisk -l
The SD card should have a name like
/dev/mmcblk0or/dev/sda.If you wish to backup your current image, do so now:
sudo dd if=/dev/<SD_NAME> of=<IMAGE_PATH> bs=1M
Note
SD_NAME is the device name (mmcblk0, sda, etc.).
IMAGE_PATH is the path to where you want the image saved – e.g., ~/turtlebot4_images/backup_image.
Get the SD flash script from
turtlebot4_setupand flash the SD card:
wget https://raw.githubusercontent.com/turtlebot/turtlebot4_setup/galactic/scripts/sd_flash.sh bash sd_flash.sh /path/to/downloaded/image
Follow the instructions and wait for the SD card to be flashed.
Remove the SD card from your PC.
Ensure your Raspberry Pi 4 is not powered on before inserting the flashed SD card.
Follow WiFi Setup to configure your WiFi.
安装最新的树莓派映像

查找最新的TurtleBot 4树莓派图片http://download.ros.org/downloads/turtlebot4/.
下载最新的图像提取它。
关闭机器人电源,然后从树莓派中取出microSD卡。
将microSD卡插入电脑。您可能需要一个适配器。
安装成像工具
dcfldd
sudo apt install dcfldd
识别您的SD卡
sudo fdisk -l
SD卡的名称应该类似于
/dev/mmcblk0or/dev/sda.如果您希望备份当前映像,请立即备份:
sudo dd if=/dev/<SD_NAME> of=<IMAGE_PATH> bs=1M

从
turtlebot4_setup获取SD闪存脚本并闪存SD卡:
wget https://raw.githubusercontent.com/turtlebot/turtlebot4_setup/humble/scripts/sd_flash.sh bash sd_flash.sh /path/to/downloaded/image
按照说明进行操作,然后等待SD卡闪存。
从电脑中取出SD卡。
插入闪存SD卡之前,请确保Raspberry Pi 4未通电。
按照 Robot Setup 来配置您的TurtleBot 4。


